Using Interfaces in UE4
Interfaces are an amazing thing that's in programming. An interface describes the behavior or capabilities of a C++ class without committing to a particular implementation of that class. Meaning any class that extends an interface has to implement the methods of that interface. You can also add more than 1 interface to a class and an abstract class you can't. More on this later. The simplest way to explain what an interface is would be it's a class with no implementation.
Why?
Say you have an interaction system and you want to only interact with specific actors in your level. You can achieve this in a ton of different ways, but generally, they're messy and a nightmare to maintain (with the exception of having an abstract class such as BaseItem and then Apple is derived from BaseItem). With interfaces, you can set specific information (not variables, but methods such as Interact or Consume or even Drop) on a class (which would force Apple to implement Interact, Consume, and Drop and the same with Banana, etc) or even you can use an interface to be an identifier (for example when using object->GetClass()->ImplementsInterface(MYINTERFACE)).
When?
So if you're wanting 2 actors to have the same properties such as Health and a Name then you should probably use an abstract class. If you're wanting to interact with both of those actors then create an interface to handle that. You can use an abstract class (or rather a base class - it holds all of the common variables for your child classes) and then have the interface for interaction.
If you just want to interact with an actor and have no data for that actor then just create an interface so you can interact with it.
How?
Ok, cool so now that you understand. Let's get to it. Because I mainly write C++ over BP I'm going to start this guide with C++. If you just want to download the project and learn on your own then feel free to here.
This is the C++ way. If you're wanting to just do interfaces in BP then scroll down more. :)
- Right-click in your Content browser -> New C++ Class or File -> New C++ Class (scroll to the bottom and choose Unreal Interface) Click Next.
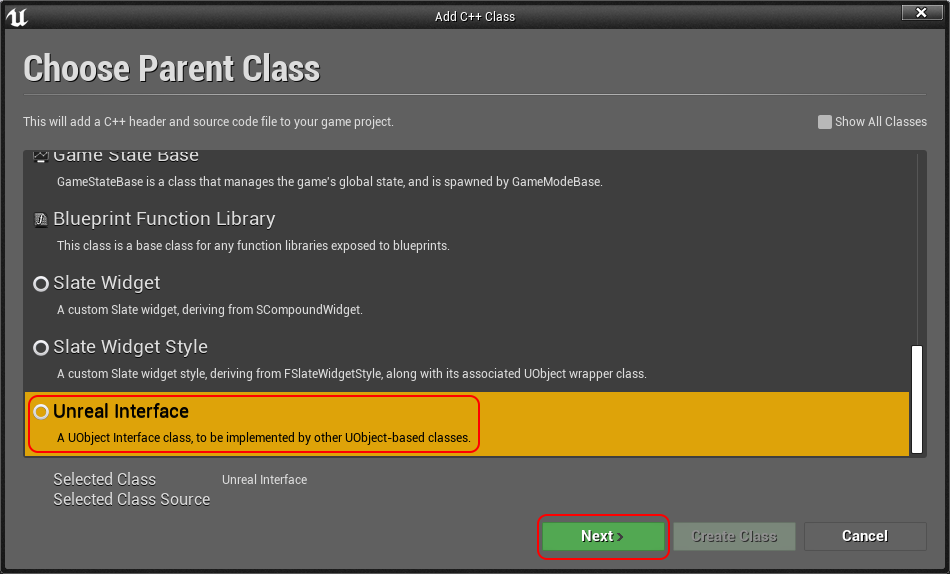
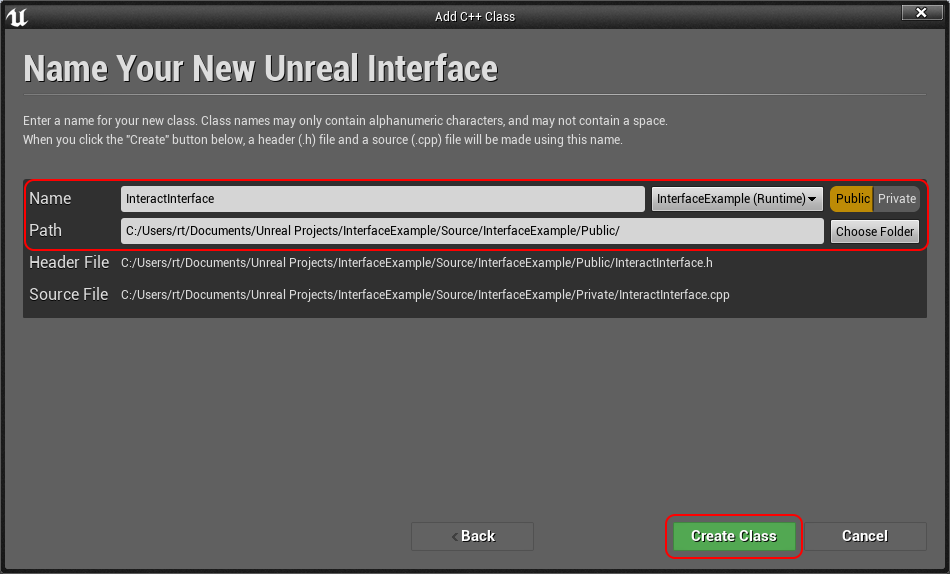
- Type in your Interface name and path then click Create Class
- The same way above, create an actor class and name it whatever. I've named mine InteractableActor.
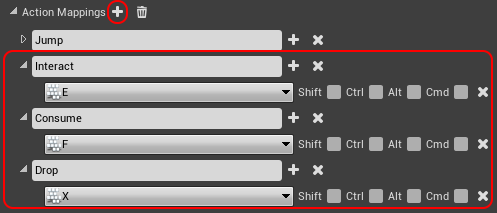
- Go to Edit -> Project Settings then Engine -> Input, now add a new Action Mapping.
- Cool, now you're done. Next guide! Just kidding, now you should open Visual Studio or whatever IDE you're using if you haven't already.
- Go into your Character class and add the following code.
// H private: /** Get the actor in the characters view */ UFUNCTION(BlueprintCallable) class AActor* GetActorInView();/** The distance that a character can interact with an actor. */ float m_MaxUseDistance = 250.0f;public:
/** Interact with the item that the character is looking at. */ UFUNCTION(BlueprintCallable) void Interact(); /** Consume the item that the character is looking at. */ UFUNCTION(BlueprintCallable) void Consume();// CPP
void AYOURCharacter::Interact() { if (AActor* const actor = GetActorInView()) { // If the actor that you’re looking at implements the interface InteractInterface if (actor->GetClass()->ImplementsInterface(UInteractInterface::StaticClass())) { IInteractInterface::Execute_Interact(actor); } } }
void AYOURCharacter::Consume() { if (AActor* const actor = GetActorInView()) { // If the actor that you’re looking at implements the interface InteractInterface if (actor->GetClass()->ImplementsInterface(UInteractInterface::StaticClass())) { IInteractInterface::Execute_Consume(actor); } } }
class AActor* AYOURCharacter::GetActorInView() { ACharacter* const Character = Cast<ACharacter>(this);
// If the character or the controller for the character are null then return a nullptr instead of running the rest of the method if (Character == nullptr || Character->GetController() == nullptr) { return nullptr; } // Get the players view point (what they're looking at) FVector CameraLocation; FRotator CameraRotation; Character->GetController()->GetPlayerViewPoint(CameraLocation, CameraRotation); // Calculate the end location for the line trace FVector EndLocation = CameraLocation + (CameraRotation.Vector() * m_MaxUseDistance); FCollisionQueryParams TraceParams(FName(TEXT("")), true, this); TraceParams.bTraceComplex = true; // Perform the line trace FHitResult HitRes; GetWorld()->LineTraceSingleByChannel(HitRes, CameraLocation, EndLocation, ECC_GameTraceChannel18, TraceParams); return Cast<AActor>(HitRes.Actor);}
Add the following to the SetupPlayerInputComponent.
// Bind interaction event PlayerInputComponent->BindAction("Interact", IE_Pressed, this, &AYOURCharacter::Interact); PlayerInputComponent->BindAction("Consume", IE_Pressed, this, &AYOURCharacter::Consume);- Head over to your Interface class and make it look like mine.
// This class does not need to be modified. UINTERFACE(MinimalAPI, BlueprintType) class UInteractInterface : public UInterface { GENERATED_BODY() };/**
- This is where you actually create your methods */ class YOURPROJECT_API IInteractInterface { GENERATED_BODY()
public: // You can even use BlueprintImplementableEvent instead of BlueprintNativeEvent // We’re using BlueprintNativeEvent so we can implement the methods in C++
// Our interact method for actors UFUNCTION(BlueprintCallable, BlueprintNativeEvent, Category = "InteractInterface") void Interact(); // Our consume method for actors UFUNCTION(BlueprintCallable, BlueprintNativeEvent, Category = "InteractInterface") void Consume();};
Basically, you just want to add your methods to the second class in the file.
- Now in your InteractableActor class add the following. At the top where it says
public Actoryou need to change it topublic Actor, public IInteractInterface. This implements the interface InteractInterface so you can use its methods. You're also going to have to include the interface's header file at the top of your class.// H UCLASS() class YOURPROJECT_API AInteractableActor : public AActor, public IInteractInterface // Inherit the interface - you can do this in BP if you'd like to { GENERATED_BODY()public: // MAKE SURE YOU ADD _Implementation TO THE METHOD NAMES!
// Implement the Consume method from our interface virtual void Consume_Implementation() override; // Implement the Interact method from our interface virtual void Interact_Implementation() override;};
// CPP void AInteractableActor::Consume_Implementation() { if (GEngine) { GEngine->AddOnScreenDebugMessage(-1, 3.0f, FColor::Orange, “(C++) gulp That was a good actor! I’m completely full now. :)”); } }
void AInteractableActor::Interact_Implementation() { if (GEngine) { GEngine->AddOnScreenDebugMessage(-1, 3.0f, FColor::Orange, “(C++) You’ve interacted with the actor!”); } }
Cool, now you're pretty much done. Go into the editor and create a BP derived of InteractableActor and place it into the world. (make sure you add a mesh to the actor so you can see it) If you want to override the C++ implementation in BP you certainly can. Just right click and Implement Function and it'll create the node for you.

This is the BP way. If you're wanting to just do interfaces in C++ then scroll up, you passed it. :)
- Right-click in your Content browser -> Blueprints -> Blueprint Interface. I named mine BP_Interface_Interact.

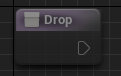
- Open your new BP interface and rename the function to Drop.
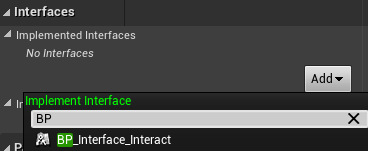
- Create a new Actor BP and click Class Settings.

- Add the interface that you just created.

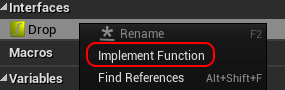
- Right-click and Implement Function.

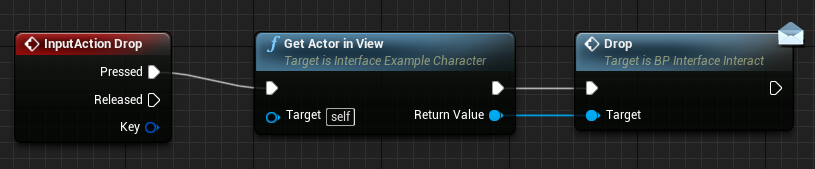
- Go into your Character class and add the following.
- The last thing to do is to add the actor to the level.
until next time